Decision Tables
Manage decisions within a spreadsheet.
Decision table is a node which allows business users to easily modify and add new rules in an intuitive way.
Evaluation Process
Decision Tables are evaluated row by row, from top to bottom, adhering to a specified hit policy.
Single row is evaluated via Inputs columns, from left to right. Each input column represents AND operator.
If cell is empty that column is evaluated truthfully, independently of the value.
If a single cell within a row fails (due to error, or otherwise), the row is skipped.
HitPolicy
The hit policy determines the outcome calculation based on matching rules. There are two hit policies available first and collect.
The result of the evaluation is:
- an object if the hit policy of the decision table is
firstand a rule matched. The structure is defined by the output fields. Qualified field names with a dot (.) inside lead to nested objects. null/undefinedif no rule matched infirsthit policy- an array of objects if the hit policy of the decision table is
collect(one array item for each matching rule) or empty array if no rules match
You can change Hit Policy in the top right corner of the decision table tab.
Schema
At the core of the Decision Table is its schema, defining the structure with inputs and outputs. Inputs encompass business-friendly expressions using the ZEN Expression Language, accommodating a range of conditions such as equality, numeric comparisons, boolean values, date time functions, array functions and more. The schema's outputs dictate the form of results generated by the Decision Table.
Inputs and outputs are expressed through a user-friendly interface, often resembling a spreadsheet. This facilitates easy modification and addition of rules, enabling business users to contribute to decision logic without delving into intricate code.
Inputs
In the assessment of rules or rows, input columns embody the AND operator. The values typically consist of (qualified) names, such as customer.country or customer.age.
There are two types of evaluation of inputs, Unary and Expression.
Unary Evaluation
Unary evaluation is usually used when we would like to compare single fields from incoming context separately, for example customer.country and cart.total . It is activated when a column has field defined in its schema.
Example
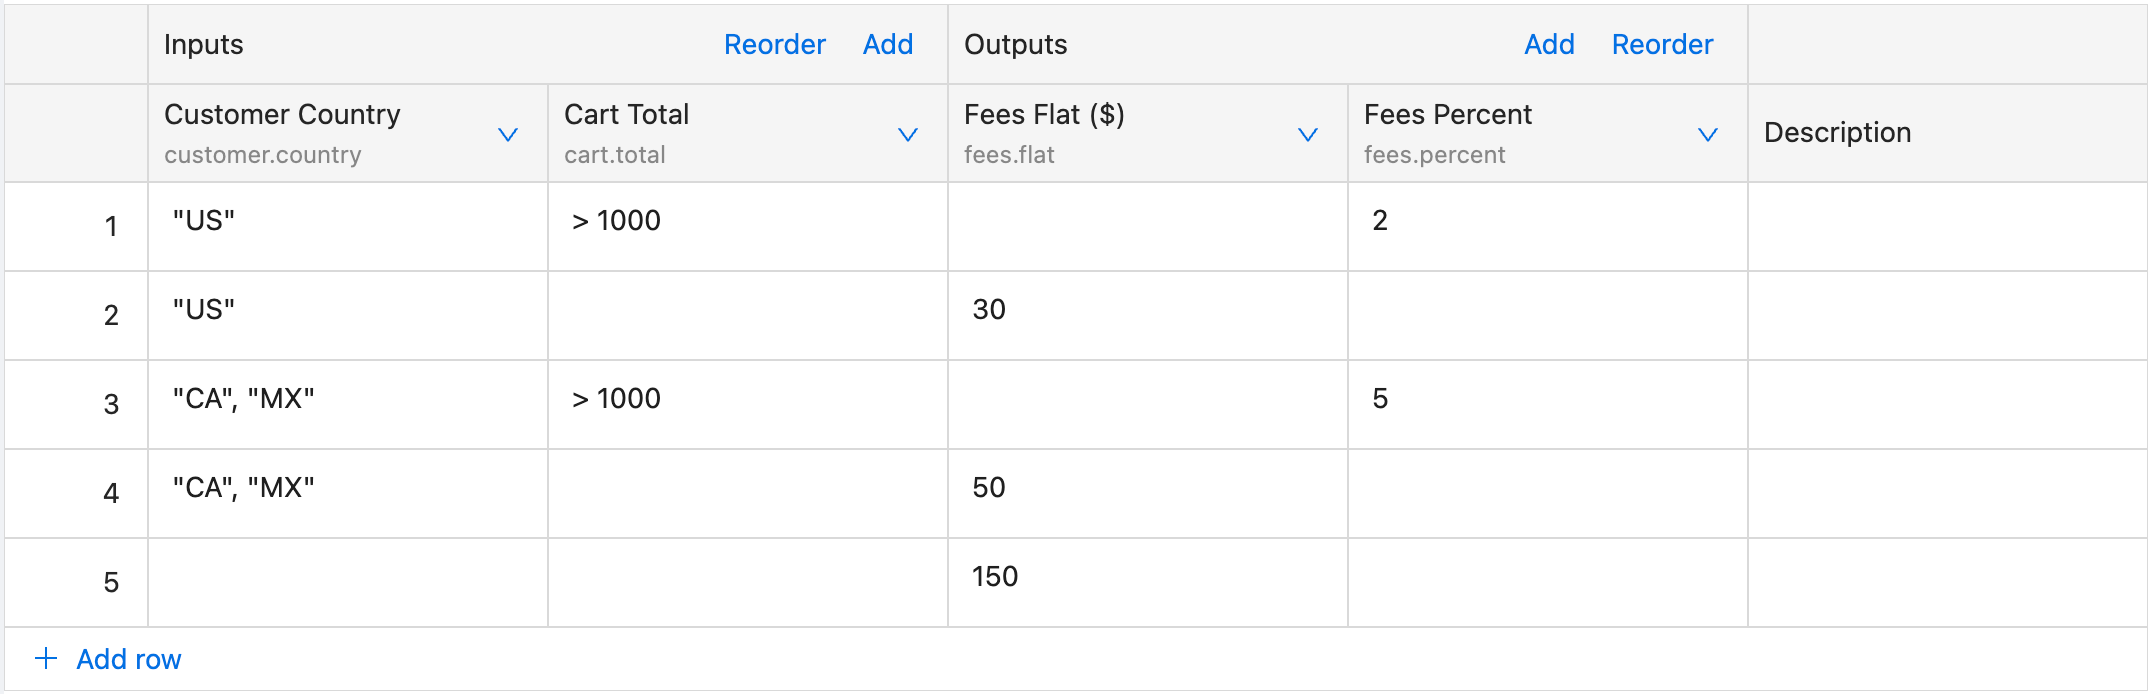
For the input:
{
  "customer": {
    "country": "US"
  },
  "cart": {
    "total": 1500
  }
}
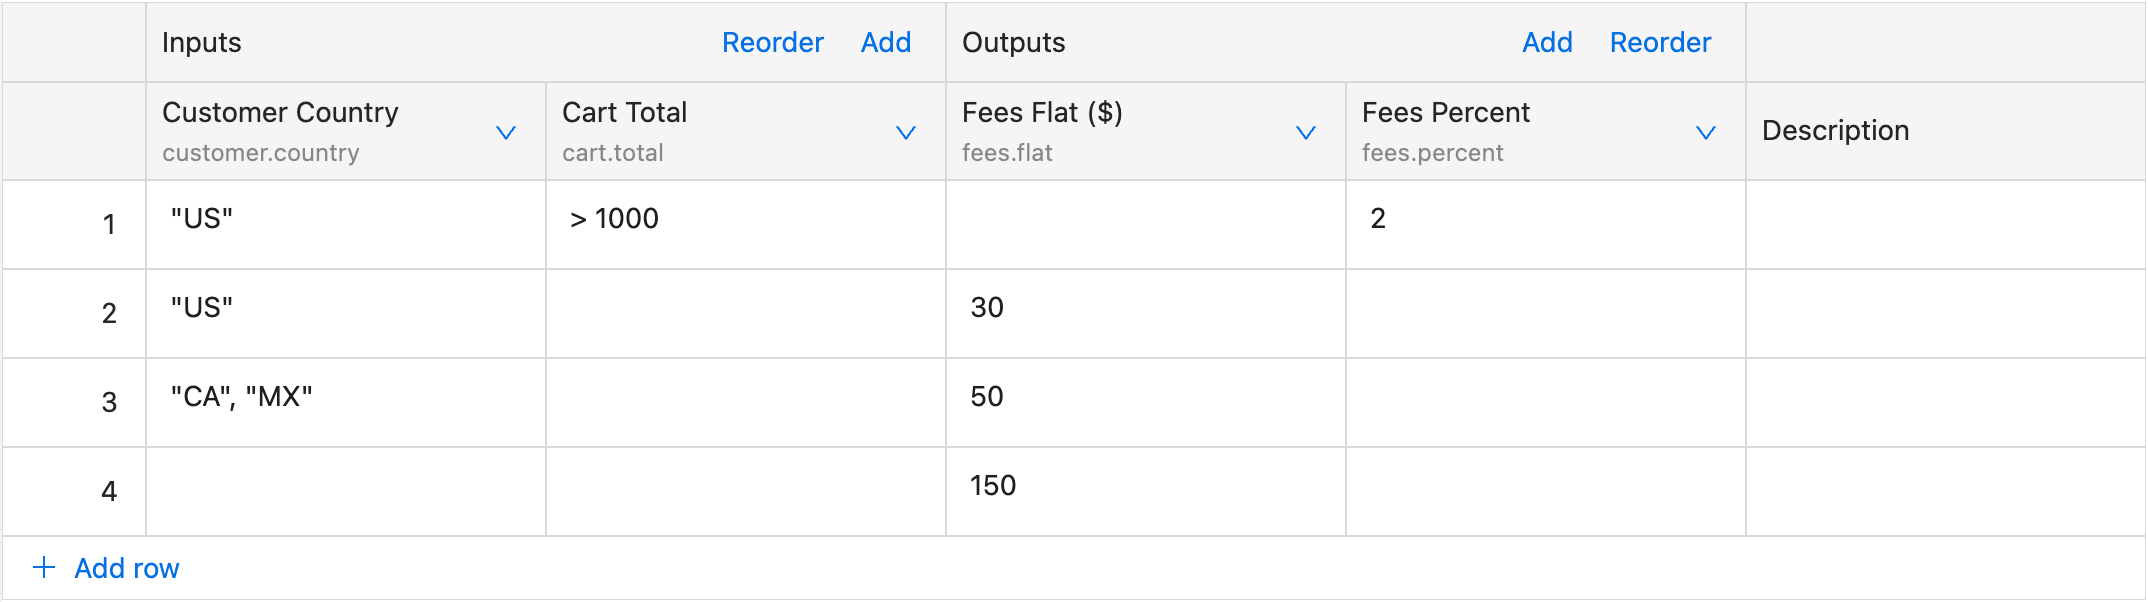
This evaluation translates to
IF customer.country == 'US' AND cart.total > 1000 THEN {"fees": {"percent": 2}}
ELSE IF customer.country == 'US' THEN {"fees": {"flat": 30}}
ELSE IF customer.country == 'CA' OR customer.country == 'MX' THEN {"fees": {"flat": 50}}
ELSE {"fees": {"flat": 150}}
List shows basic example of the unary tests in the Input Fields:
| Input entry | Input Expression |
|---|---|
| "A" | the field equals "A" |
| "A", "B" | the field is either "A" or "B" |
| 36 | the numeric value equals 36 |
| < 36 | a value less than 36 |
| > 36 | a value greater than 36 |
| [20..39] | a value between 20 and 39 (inclusive) |
| 20,39 | a value either 20 or 39 |
| true | the boolean value true |
| false | the boolean value false |
| any value, even null/undefined | |
| null | the value null or undefined |
Note: For the full list please visit ZEN Expression Language.
Expression Evaluation
Expression evaluation is used when we would like to create more complex evaluation logic inside single cell. It allows us to compare multiple fields from the incoming context inside same cell.
It can be used by providing an empty Selector (field) inside column configuration.
Example
For the input:
{
  "transaction": {
    "country": "US",
    "createdAt": "2023-11-20T19:00:25Z",
    "amount": 10000
  }
}
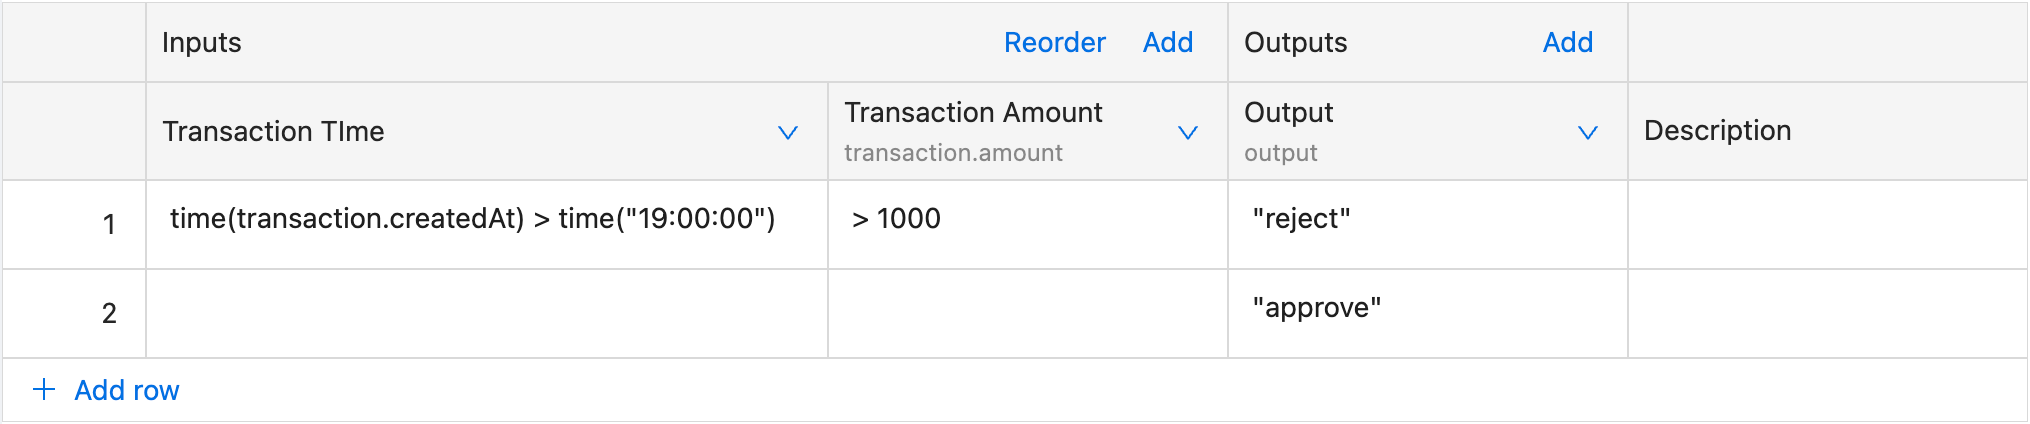
IF time(transaction.createdAt) > time("17:00:00") AND transaction.amount > 1000 THEN {"status": "reject"}
ELSE {"status": "approve"}
Note: For the full list please visit ZEN Expression Language.
Outputs
Output columns serve as the blueprint for the data that the decision table will generate when the conditions are met during evaluation.
When a row in the decision table satisfies its specified conditions, the output columns determine the nature and structure of the information that will be returned. Each output column represents a distinct field, and the collective set of these fields forms the output or result associated with the validated row. This mechanism allows decision tables to precisely define and control the data output.
Example

And the result would be:
{
  "flatProperty": "A",
  "output": {
    "nested": {
      "property": "B"
    },
    "property": 36
  }
}
Defining schema
Adding columns
To define or modify the schema click on the Add button of either inputs or outputs.
A column in the schema is defined with:
- Label - User facing name of the field
- Selector (optional for Inputs) - Used to extract data from the input or build an output JSON. You can use dots (.) for nested content. If not set for the inputs, that column will get access to a full Expression Language capability.
Modifying columns
To modify a column, press More (⌄) and then press Edit column. You will be presented with a popup form.
Deleting column
Deleting column is done by pressing More (⌄) and then press Remove column.
Deleting a column will result in all rows losing data for that column. You may restore them from previous version.
Reordering columns
Reordering columns is done by pressing Reorder button either in Inputs or Outputs section and dragging a column inside the dialog.
Resizing a column
To resize a column drag it by the right edge.
Adding and editing rows
After we have defined our inputs and outputs, we can start adding rules by pressing plus (+) button in the last row of the table. Editing cell is done by selecting a cell or if cell is already selected, by typing a value.
It's a good practice to leave the last row with empty inputs which acts as a default value.
Reordering rows
Rows can be reordered by dragging the row on it's index (left-side) and dropping it in a desired place.
Excel (CSV) support
Besides default table editor (Admin UI) it's also possible to modify decision table from the Microsoft Excel. To export table to Excel press Export CSV button in the decision table tab.
Importing from Excel can be done by pressing Upload CSV, selecting a file from your computer and importing it.
Excel uses a specific format that needs to be followed. Metadata present in the CSV header should not be edited without technical expertise.
Key combinations
Key combinations may be used to quickly perform actions on the table:
- - adds a row above
- - adds a row below
- - remove the current row
- - copies the data from the selected field
- - pastes the data from the selected field
- - clears the field
- - move to next column
- - move to previous column
- Enter - move to next row
- ⇧ + Enter - move to previous row
- Arrow keys - move between columns (only while not editing)